The Define Ports dialog box is at the centre of the proxy. It defines the connections you want to make to the Internet.
You can use FreeProxy to connect to mail server, another proxy server, any server using the tunnel facility or directly to the internet.
See the end of this page for some examples.
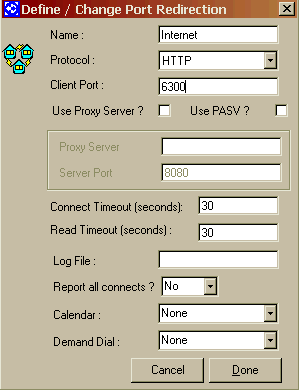
Any name consisting of spaces, numbers and letters to identify this particular redirection. Eg 'Internet', 'Mail 001' or 'ICQ50'
Select one of:
"None" - FreeProxy acts as a tunnel.
"HTTP" - The normal internet protocol.
"POP" and "SMTP" - Required for email
"Telnet" - Required for Telnet
The port number that the browsers will specify in their internet options. Usually (but not necessarily)
8080 for internet proxy
25 for outgoing mail (SMTP)
110 for incoming mail (POP3)
23 for Telnet
If there is a conflict with existing ports then change these numbers as required. The port numbers used here should be the same port used the program connecting to the FreeProxy.
For tunnelling, use any port.
If you have a conflict see Resolving Port Conflicts
You will need to connect to a proxy server if you need to access a mail server such as pop or smtp. See How to Set up Mail here. If you need to connect to your ISP proxy server, then click the 'Use proxy server ?' check box, and fill in the proxy server name.
If you do not need access to any proxy server, leave the 'Use proxy server ?' unchecked.
If you select none, SMTP, POP or Telnet as the protocol, you will have to enter a server name.
The Server can either an address in the form <computer name>.<domain> name or an IP address. For example:
melbourne.alpharand.com.au
192.168.054.7
proxy.biglake.com
When connecting to a FTP server from the client browser (eg: ftp://ftp.microsoft.com), then you can elect to use a passive mode connection. In non-passive mode connections, FreeProxy opens a listening port for the transfer of data from the remote server. In passive mode, FreeProxy requests the remote server to open the listening port for the transfer of data. Passive mode is marginally more secure and can prevent blockage by a firewall. Also see here
The port number of the proxy you are connecting to. Normally you would use the default displayed but they can be changed if required.
A value which FreeProxy will use to wait for a connection. If the this time is exceeded, then FreeProxy will cancel the communication function it is attempting and wait for the next event. Default: 30 seconds.
To open the connection on a specific interface, check the box and use the drop down to select a specific Network interface and IP address. If left unchecked, the server will listen on all interfaces. For a detailed explanation see here.
A value which FreeProxy will use to wait for the remote to respond or acknowledge a read or write event. Default: 30 seconds.
If trace has been set up to log information, then this is the log file that will receive the trace.
Setting this to "yes" will report in the log file every URL retrieved by the client. Trace information (see here) must be set to at least warning level.
A Calendar specified here will constrain the times that this port re-direction may be used. Users will not be able to connect outside of the times on the calendar. No calendar here (Option 'No') will allow access at all times. Before any calendars are listed here, they would first have to be created using the 'Define Calendars' option in the FreeProxy Control Centre.
It is possible to demand dial a connection. This means that when a users starts their browser and connects to FreeProxy using this port, FreeProxy will dial the connection mentioned here if no connection is currently active. This dropdown box defaults to 'No' (Don't dial). It will also list RAS connection information that was set up using the 'Define RAS' option in the FreeProxy Control Centre.
Deletes the port information being displayed.
This button will cancel changes and return to the FreeProxy Control Centre.
Finishes editing the current dialog box and returns to the FreeProxy Control Centre.
This example shows both the view of Internet Explorer and the FreeProxy Control centre.
Assume that you wish to connect your server (192.168.20.9) to the internet. You have set up a Port entry called 'Internet' but you want to allow access to the port at all times. You have decided to use port 6300 for the client port. The Port Redirection entry will look like this:
The Internet Explorer 6 entry will look like this (in IE 6 select Tools è Internet Options è Connections è LAN Settings):
